# Integrate Unity Gaming Services (UGS) in Unity
## Overview
This is a sample project to showcase the Openfort integration with [Unity Gaming Services](https://unity.com/solutions/gaming-services), a complete service ecosystem for Unity live games.
The sample includes:
* [**`ugs-backend`**](https://github.com/openfort-xyz/ugs-unity-game-services-sample/tree/main/ugs-backend)
A .NET Core project with [Cloud Code C# modules](https://docs.unity.com/ugs/en-us/manual/cloud-code/manual/modules#Cloud_Code_C#_modules) that implement [Openfort C# SDK](https://www.nuget.org/packages/Openfort.SDK/1.0.21) methods. Hosted in UGS.
* [**`unity-client`**](https://github.com/openfort-xyz/ugs-unity-game-services-sample/tree/main/unity-client)
A Unity sample game that connects to `ugs-backend` through [Cloud Code](https://docs.unity.com/ugs/manual/cloud-code/manual). It uses [Openfort Unity SDK](https://github.com/openfort-xyz/openfort-csharp-unity) to deserialize its responses.
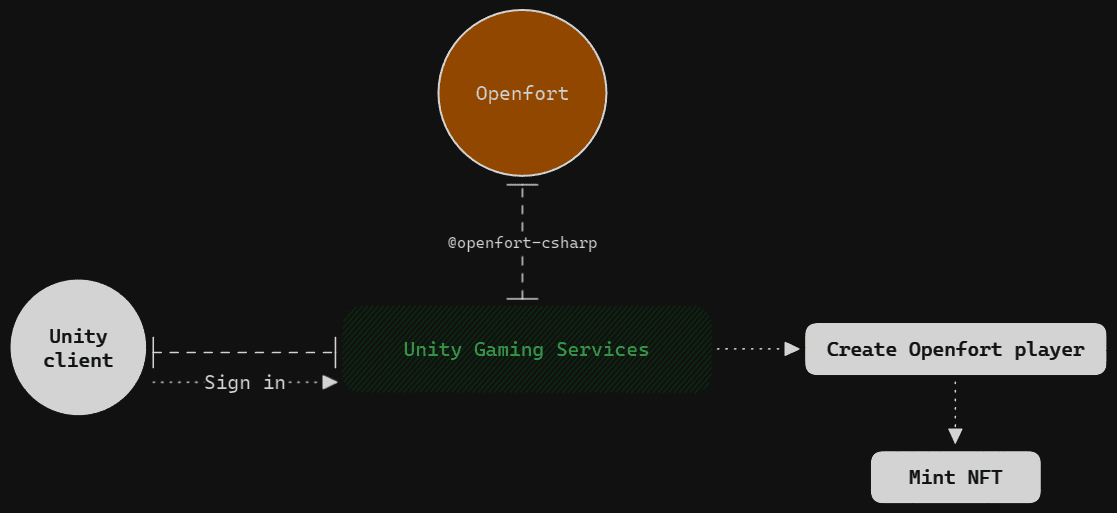
The sample uses [Unity Authentication](https://docs.unity.com/ugs/en-us/manual/kit/manual/get-started) to sign in as a new anonymous player. It then [creates an Openfort player](https://github.com/openfort-xyz/ugs-unity-game-services-sample/blob/ab1a5f69346910c18ea88579f6fce81cdcde489a/ugs-backend/CloudCodeModules/PlayersModule.cs#L31) and a [custodial account](https://github.com/openfort-xyz/ugs-unity-game-services-sample/blob/ab1a5f69346910c18ea88579f6fce81cdcde489a/ugs-backend/CloudCodeModules/PlayersModule.cs#L38) using Openfort and it [links it](https://github.com/openfort-xyz/ugs-unity-game-services-sample/blob/ab1a5f69346910c18ea88579f6fce81cdcde489a/ugs-backend/CloudCodeModules/PlayersModule.cs#L43) to the Unity player. Then the player can frictionlessly [mint a Token](https://github.com/openfort-xyz/ugs-unity-game-services-sample/blob/ab1a5f69346910c18ea88579f6fce81cdcde489a/ugs-backend/CloudCodeModules/MintingModule.cs#L26).
## Application Workflow
## Prerequisites
* **Get started with Openfort**
* [Sign in](https://dashboard.openfort.io/login) or [sign up](https://dashboard.openfort.io/register) and create a new dashboard project
* **Get started with UGS**
* [Complete basic prerequisites](https://docs.unity.com/ugs/manual/overview/manual/getting-started#Prerequisites)
* [Create a project](https://docs.unity.com/ugs/manual/overview/manual/getting-started#CreateProject)
## Setup Openfort dashboard
* [Add a Contract](https://dashboard.openfort.io/contracts/new)
This sample requires a contract to run. We use [0xbed6a05ce8719bc00db1cc81a814192c82be1bb1](https://mumbai.polygonscan.com/address/0xbed6a05ce8719bc00db1cc81a814192c82be1bb1) (Token contract deployed in 80002 Amoy). You can use this for the guide:
* [Add a Policy](https://dashboard.openfort.io/policies/new)
We aim to cover gas fees for users. Set a new gas policy:
Now, add a rule so our contract uses this policy:
## Set up [`ugs-backend`](https://github.com/openfort-xyz/ugs-unity-game-services-sample/tree/main/ugs-backend)
* ### Set Openfort dashboard variables
Open the [solution](https://github.com/openfort-xyz/ugs-unity-game-services-sample/blob/main/ugs-backend/CloudCodeModules.sln) with your preferred IDE, open [`SingletonModule.cs`](https://github.com/openfort-xyz/ugs-unity-game-services-sample/blob/main/ugs-backend/CloudCodeModules/CloudCodeModules.csproj) and fill in these variables:
* [Retrieve the **Secret key**](https://dashboard.openfort.io/api-keys)
* [Retrieve the **Contract API ID**](https://dashboard.openfort.io/contracts)
* [Retrieve the **Policy API ID**](https://dashboard.openfort.io/policies)
* ### Package Code
Follow [the official documentation steps](https://docs.unity.com/ugs/en-us/manual/cloud-code/manual/modules/getting-started#Package_code).
* ### Deploy to UGS
Follow [the official documentation steps](https://docs.unity.com/ugs/en-us/manual/cloud-code/manual/modules/getting-started#Deploy_a_module_project).
## Set up [`unity-client`](https://github.com/openfort-xyz/ugs-unity-game-services-sample/tree/main/unity-client)
Follow the [official documentation steps](https://docs.unity.com/ugs/manual/kit/manual/get-started#Link_your_project) to link the `unity-client` to your UGS Project ID.
## Test in Editor
Play the **Main** scene and click ***Sign in*** button. After some authentication-related logs, this panel should appear:
Select ***Mint***. After a brief period, you should see a representation of your newly minted Token:
In the [Openfort Players dashboard](https://dashboard.openfort.io/players), a new player entry should be visible. On selecting this player:
You'll notice that a `mint` transaction has been successfully processed:
Additionally, by choosing your **Amoy Account** and viewing ***Token Transfers***, the transaction is further confirmed:
Keep in mind that the sample is designed so a player can mint only once. By default, UGS Authentication will use the same player per device. If you want to sign in with a new player check the ***Clear Session Token*** in ***AuthController***:
## Conclusion
Upon completing the above steps, your Unity game will be fully integrated with Openfort and UGS. Always remember to test every feature before deploying to guarantee a flawless player experience.
For a deeper understanding of the underlying processes, check out the [tutorial video](https://youtu.be/PHNodBmbEfA).
## Get support
If you found a bug or want to suggest a new \[feature/use case/sample], please [file an issue](https://github.com/openfort-xyz/ugs-unity-game-services-sample/issues).
If you have questions, or comments, or need help with code, we're here to help:
* on Twitter at https://x.com/openfort\_hq
* on Telegram: https://t.me/openfort
* by email: support@openfort.io


