# Setup game ads to sponsor gas fees
## Overview
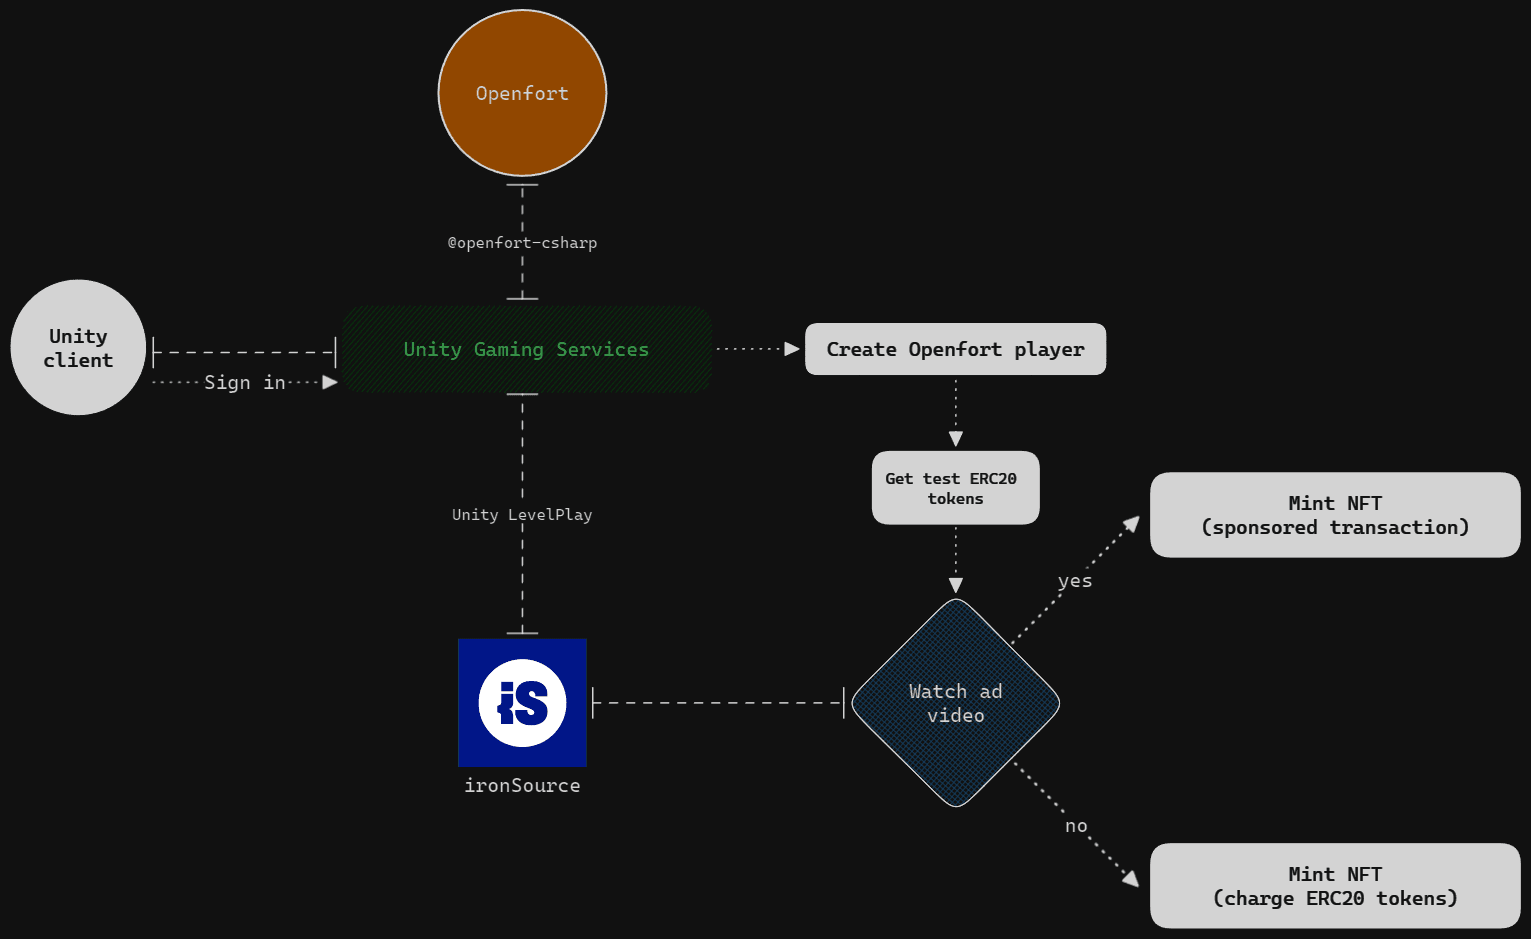
This sample project showcases the Openfort integration with [Unity LevelPlay](https://docs.unity.com/monetization-dashboard/en-us/manual/UnityLevelPlay).
The sample includes:
* [**`ugs-backend`**](https://github.com/openfort-xyz/iap-unity-sample/tree/main/ugs-backend)
A .NET Core project with [Cloud Code C# modules](https://docs.unity.com/ugs/en-us/manual/cloud-code/manual/modules#Cloud_Code_C#_modules) that implement [Openfort C# SDK](https://www.nuget.org/packages/Openfort.SDK/1.0.21) methods. Needs to be hosted in Unity Gaming Services.
* [**`unity-client`**](https://github.com/openfort-xyz/iap-unity-sample/tree/main/unity-client)
A Unity sample game that connects to `ugs-backend` through [Cloud Code](https://docs.unity.com/ugs/manual/cloud-code/manual). It uses [Openfort Unity SDK](https://github.com/openfort-xyz/openfort-csharp-unity) to have full compatibility with `ugs-backend` responses.
## Application Workflow
## Prerequisites
* **Get started with Openfort**
* [Sign in](https://dashboard.openfort.io/login) or [sign up](https://dashboard.openfort.io/register) and create a new dashboard project
* **Get started with UGS**
* [Complete basic prerequisites](https://docs.unity.com/ugs/manual/overview/manual/getting-started#Prerequisites)
* **Get started with ironSource**:
* [Sign up](https://developers.is.com/ironsource-mobile/air/sign-up-ironsource/) on the ironSource website
## Set up Openfort dashboard
* [Add a Token contract](https://dashboard.openfort.io/contracts/new)
This sample requires a Token contract to run. We use [0xbed6a05ce8719bc00db1cc81a814192c82be1bb1](https://mumbai.polygonscan.com/address/0xbed6a05ce8719bc00db1cc81a814192c82be1bb1) (contract deployed in 80002 Amoy). You can use it for this tutorial too:
* [Add an ERC20 contract](https://dashboard.openfort.io/contracts/new)
This sample also requires an ERC20 contract to run. You can [deploy a standard one](https://thirdweb.com/thirdweb.eth/TokenERC20) and then add it to the Openfort dashboard following the same logic as above.
* [Add a Full Sponsor Policy](https://dashboard.openfort.io/policies/new)
We aim to cover gas fees for our users when they mint the Token (if they have watched the ad video). Set a new gas policy for that:
Add a rule so the Token contract uses this policy:
Add also a rule for the ERC20 contract, as we want to send some ERC20 tokens to the player to be able to test the sample:
* [Add a Fixed Charge Policy](https://dashboard.openfort.io/policies/new)
The users will be charged with 1 in-game ERC20 token when they decide not to watch the ad:
Add a rule so the policy applies to the Token contract:
* [Add a Backend wallet](https://dashboard.openfort.io/accounts)
Enter a name and choose ***Add account***:
This will automatically create a custodial wallet that we'll use to send the ERC20 tokens to the users. **IMPORTANT: Transfer a good amount of tokens from the created ERC20 contract to this wallet to facilitate testing**.
## Set up ironSource
* ### Get Unity Cloud keys
Before going into ironSource, go to the [Unity Cloud dashboard](https://cloud.unity.com/) and open ***Unity Ads Monetization*** using *Shortcuts*:
* #### Create a LevelPlay Service Account
Now go to the ***API management*** section and choose ***Create LevelPlay Service Account***:
Copy and save the ***Key ID*** and the ***Secret key*** somewhere safe and choose ***Done***:
* #### Get Monetization Stats API Access
Copy and save the API Key. Choose ***Create API Key*** if it's not already there:
* #### Get Organization Core ID
Copy and save the Organization Core ID:
* ### Create an ironSource LevelPlay app
Go to the [ironSource dashboard](https://platform.ironsrc.com/partners/dashboard) and under the *LevelPlay* section, choose ***Add app*** and enter your app details:
Select the following settings and choose ***Add app***:
Activate ***Rewarded Video*** as an ad unit and choose ***Continue***:
* ### Set up SDK Networks
In the *Available Networks* panel select ***Unity Ads***:
Enable the ***Unity bidder auto-setup*** option, add all the credentials from the [*Get Unity Cloud keys* section](https://github.com/openfort-xyz/unity-ad-sample#get-unity-cloud-keys) and choose ***Save***:
{" "}
*Unity Ads* will have appeared as a new available network. Choose ***Setup***:
Because we enabled the *Unity bidder auto-setup* option, now you can choose ***Add bidder***:
The needed information from Unity will be automatically retrieved. Choose ***Save***:
## Set up Unity Cloud
Thanks to the *Unity bidder auto-setup* option, a new project has been automatically created in the [Unity Cloud dashboard](https://cloud.unity.com/). Now your LevelPlay Service Account needs to have some admin roles over this newly created project. Go to ***Administration --> Service accounts*** and choose your account:
Scroll down and choose ***Manage project roles***:
Select your project and choose ***Next***:
In the *Admin* dropdown select:
* ***Player Resource Policy Editor***
* ***Project Resource Policy Editor***
* ***Unity Environments Admin***
In the *LiveOps* dropdown select:
* ***Cloud Code Script Publisher***
* ***Triggers Configuration Editor***
* ***Leaderboards Admin***
* ***Cloud Code Editor***
Choose ***Save***:
## Set up [`ugs-backend`](https://github.com/openfort-xyz/iap-unity-sample/tree/main/ugs-backend)
* ### Set Openfort dashboard variables
Open the [solution](https://github.com/openfort-xyz/iap-unity-sample/blob/main/ugs-backend/CloudCodeModules.sln) with your preferred IDE, open [`SingletonModule.cs`](https://github.com/openfort-xyz/iap-unity-sample/blob/main/ugs-backend/CloudCodeModules/SingletonModule.cs) and fill in these variables:
* `OfApiKey`: [Retrieve the **Openfort secret key**](https://dashboard.openfort.io/api-keys)
* `OfTokenContract`: [Retrieve the **Token contract API ID**](https://dashboard.openfort.io/contracts)
* `OfGoldContract`: [Retrieve the **ERC20 contract API ID**](https://dashboard.openfort.io/contracts)
* `OfFullSponsorPolicy`: [Retrieve the **Full Sponsor Policy API ID**](https://dashboard.openfort.io/policies)
* `OfChargeErc20Policy`: [Retrieve the **Fixed Charge Policy API ID**](https://dashboard.openfort.io/policies)
* `OfDevAccount`: [Retrieve the **Developer Account API ID**](https://dashboard.openfort.io/accounts)
* ### Package Code
Follow [the official documentation steps](https://docs.unity.com/ugs/en-us/manual/cloud-code/manual/modules/getting-started#Package_code).
* ### Deploy to UGS
Follow [the official documentation steps](https://docs.unity.com/ugs/en-us/manual/cloud-code/manual/modules/getting-started#Deploy_a_module_project).
## Set up [`unity-client`](https://github.com/openfort-xyz/iap-unity-sample/tree/main/unity-client)
In Unity go to *Edit --> Project Settings --> Services* and link the `unity-client` to your UGS Project:
Select your *Environment*:
Under *Assets --> Scripts --> Controllers* open the ***AdsController.cs***:
Fill the **`appKey`** variable with the *ironSource LevelPlay app key* and save the script:
## Build to Android
In Unity go to [*Android Player settings*](https://docs.unity3d.com/Manual/class-PlayerSettingsAndroid.html) and make sure *Other Settings* looks like this:
Also, make sure to sign the application with a [Keystore](https://docs.unity3d.com/Manual/android-keystore-create.html) in *Publishing Settings*:
Return to *Build Settings* and choose ***Build***:
Send and run the *.apk* on your device.
## Conclusion
Upon completing the above steps, your Unity game will be fully integrated with Openfort and [Unity LevelPlay](https://docs.unity.com/monetization-dashboard/en-us/manual/UnityLevelPlay). Always remember to test every feature before deploying to guarantee a flawless player experience.
For a deeper understanding of the underlying processes, check out the [tutorial video](https://www.youtube.com/watch?v=vjjvDILS-DU).
## Get support
If you found a bug or want to suggest a new \[feature/use case/sample], please [file an issue](https://github.com/openfort-xyz/iap-unity-sample/issues).
If you have questions, or comments, or need help with code, we're here to help: