# Add reCAPTCHA in your Unity game
## Overview
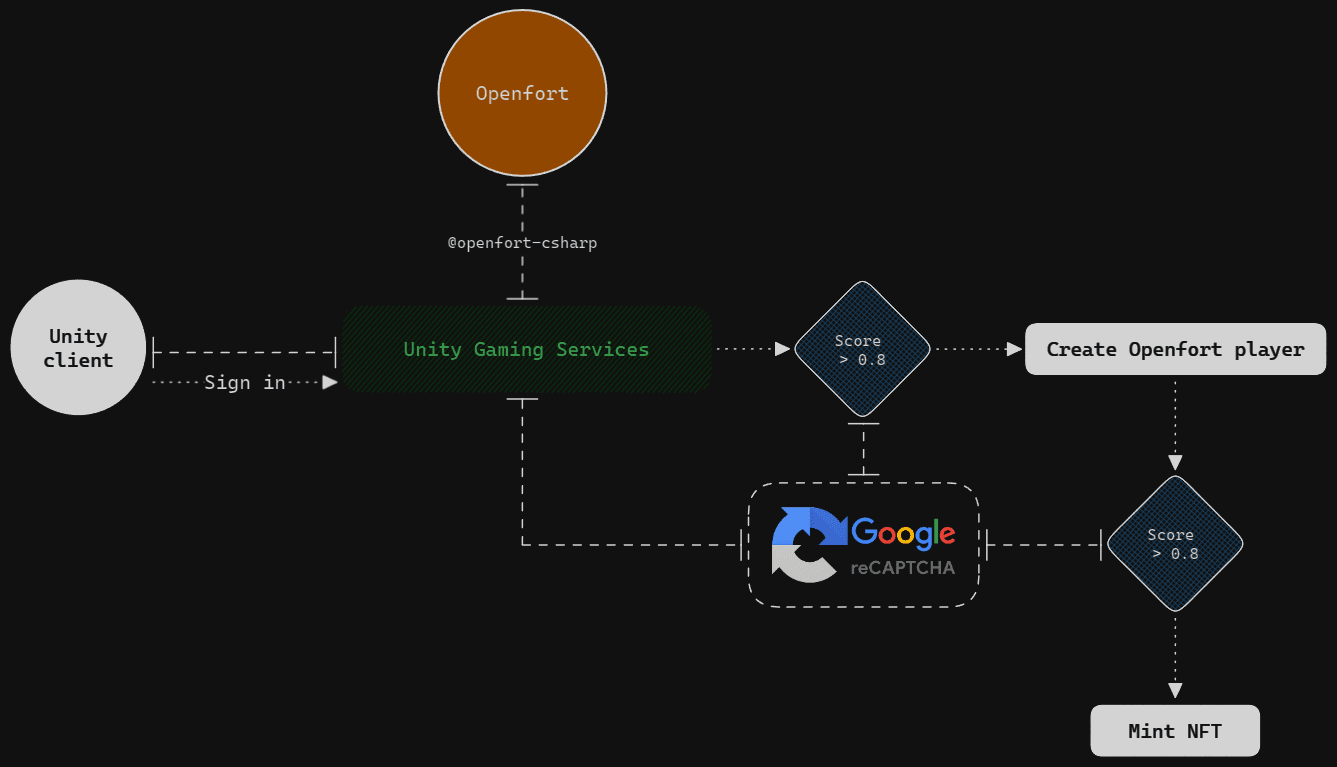
This is a sample project to showcase the Openfort integration with [Google reCAPTCHA V3](https://developers.google.com/recaptcha/docs/v3), a system to help you protect your sites from fraudulent activities, spam, and abuse. In this sample, we will activate reCAPTCHA verification every time the user tries to perform a key action like authenticating or minting a Token.
The sample includes:
* [**`ugs-backend`**](https://github.com/openfort-xyz/unity-recaptcha-sample/tree/main/ugs-backend)
Some [Cloud Code JS scripts](https://docs.unity.com/ugs/en-us/manual/cloud-code/manual/scripts) to interact with the Openfort API from UGS BaaS.
* [**`unity-client`**](https://github.com/openfort-xyz/unity-recaptcha-sample/tree/main/unity-client)
A Unity sample game that connects to `ugs-backend` through [Cloud Code Client SDK](https://docs.unity.com/ugs/manual/cloud-code/manual). It uses [Openfort Unity SDK](https://github.com/openfort-xyz/openfort-csharp-unity) to have full compatibility with `ugs-backend` responses.
## Workflow diagram
## Prerequisites
* **Get started with Openfort**
* [Sign in](https://dashboard.openfort.io/login) or [sign up](https://dashboard.openfort.io/register) and create a new dashboard project
* **Get started with UGS**
* [Complete basic prerequisites](https://docs.unity.com/ugs/manual/overview/manual/getting-started#Prerequisites)
* [Create a project](https://docs.unity.com/ugs/manual/overview/manual/getting-started#CreateProject)
* **Get started with GitHub Pages**
* [Create a repository for your site](https://docs.github.com/en/pages/getting-started-with-github-pages/creating-a-github-pages-site#creating-a-repository-for-your-site)
* [Create your site](https://docs.github.com/en/pages/getting-started-with-github-pages/creating-a-github-pages-site#creating-your-site)
## Setup Openfort dashboard
* [Add a Contract](https://dashboard.openfort.io/contracts/new)
This sample requires a Token contract to run. We use [0xbed6a05ce8719bc00db1cc81a814192c82be1bb1](https://mumbai.polygonscan.com/address/0xbed6a05ce8719bc00db1cc81a814192c82be1bb1) (Token contract deployed in 80002 Amoy). You can use it for this tutorial:
* [Add a Policy](https://dashboard.openfort.io/policies/new)
We aim to cover gas fees for users. Set a new gas policy:
Now, add a rule so our contract uses this policy:
## Set up reCAPTCHA V3
Go to [reCAPTCHA v3 Admin Console](https://www.google.com/recaptcha/admin) to register a new site. Choose ***Switch to create a classic key*** if the option is available:
Enter a ***Label*** name, select the ***reCAPTCHA type*** and enter your GitHub Pages URL as a ***Domain***:
Accept the terms of service and choose ***Submit***:
Copy the ***Site Key*** and the ***Secret Key*** and save them somewhere safe:
## Set up [`ugs-backend`](https://github.com/openfort-xyz/ugs-unity-game-services-sample/tree/main/ugs-backend)
* ### Fill in environment variables
* [Retrieve the **API Secret key**](https://dashboard.openfort.io/api-keys) and fill in the [`openfortApiKey`](https://github.com/openfort-xyz/unity-recaptcha-sample/blob/55f91101ff4eae301b6d8c98458023c6b3b34d6e/ugs-backend/CreateOpenfortPlayer.js#L5) variable.
* [Use the same **API Secret key**](https://dashboard.openfort.io/api-keys) to fill the [`openfortApiKey`](https://github.com/openfort-xyz/unity-recaptcha-sample/blob/55f91101ff4eae301b6d8c98458023c6b3b34d6e/ugs-backend/MintToken.js#L5) variable.
* [Retrieve the **Token Contract API ID**](https://dashboard.openfort.io/contracts) and fill in the [`tokenContractId`](https://github.com/openfort-xyz/unity-recaptcha-sample/blob/55f91101ff4eae301b6d8c98458023c6b3b34d6e/ugs-backend/MintToken.js#L9C11-L9C25) variable.
* [Retrieve the **Policy API ID**](https://dashboard.openfort.io/policies) and fill in the [`policyId`](https://github.com/openfort-xyz/unity-recaptcha-sample/blob/55f91101ff4eae301b6d8c98458023c6b3b34d6e/ugs-backend/MintToken.js#L10C11-L10C19) variable.
* Fill in the [`secretKey`](https://github.com/openfort-xyz/unity-recaptcha-sample/blob/55f91101ff4eae301b6d8c98458023c6b3b34d6e/ugs-backend/VerifyReCaptcha.js#L6) with your **reCAPTCHA secret key**.
* ### Deploy to UGS
Follow [the official documentation steps](https://docs.unity.com/ugs/en-us/manual/cloud-code/manual/scripts/getting-started#Deploy_a_Cloud_Code_script) to deploy each and all of the Cloud Code scripts.
## Set up [`unity-client`](https://github.com/openfort-xyz/ugs-unity-game-services-sample/tree/main/unity-client)
* ### Link to UGS project
Follow the [official documentation steps](https://docs.unity.com/ugs/manual/kit/manual/get-started#Link_your_project) to link the `unity-client` to your UGS Project.
* ### Fill in needed variables
On the [Main scene](https://github.com/openfort-xyz/unity-recaptcha-sample/tree/main/unity-client/Assets/Scenes), select the *ReCaptchaController* game object and fill in your **reCAPTCHA site key**:
## Build to WebGL
> **IMPORTANT:** You need to build this sample to the root folder of the GitHub Pages repository.
In Unity go to *File --> Build Settings*, select *Web* platform and choose ***Build***:
Find your GitHub Pages repository root folder and choose ***Select Folder***:
After the build is completed, go to your GitHub Pages repository URL and you should see the *Sign in* panel:
Open the browser console to check that reCAPTCHA V3 is loaded and ready:
Click the ***Sign in*** button and after some authentication-related logs, the *Mint* panel should appear. In the console logs, we should see a positive reCAPTCHA verification score. Because we passed the reCAPTCHA verification, an Openfort player should have been created:
If you click the ***Mint*** button, the game will go through another reCAPTCHA verification. After a brief period, you should see the *Token minted* panel with the Openfort player account address in a button:
Click on the ***Address*** button to open Etherscan and see that the transaction is confirmed:
## Code walkthrough
All this is thanks to the [**`ReCaptcha.jslib plugin`**](https://github.com/openfort-xyz/unity-recaptcha-sample/blob/main/unity-client/Assets/Plugins/WebGL/ReCaptcha.jslib) located in the Unity client, which allows the execution of reCAPTCHA V3 from the client. The `.jslib` methods are called from the [**`ReCaptchaController.cs`**](https://github.com/openfort-xyz/unity-recaptcha-sample/blob/main/unity-client/Assets/Scripts/ReCaptchaController.cs).
Then, when reCAPTCHA V3 gets the response token from the execution, we validate it in the backend through [**`VerifyReCaptcha.js`**](https://github.com/openfort-xyz/unity-recaptcha-sample/blob/main/ugs-backend/VerifyReCaptcha.js)
## Conclusion
Upon completing the above steps, your Unity game will be fully integrated with Openfort and Google reCAPTCHA V3. Always remember to test every feature before deploying to guarantee a flawless player experience.
## Get support
If you found a bug or want to suggest a new \[feature/use case/sample], please [file an issue](https://github.com/openfort-xyz/unity-recaptcha-sample/issues).
If you have questions, or comments, or need help with code, we're here to help:
* on Twitter at https://x.com/openfort\_hq
* on Telegram: https://t.me/openfort
* by email: support@openfort.io